Color correction basics are very important in the process of becoming a skilled video editor. It’s like seasoning a dish with the right spices; that can transform a good video into a great one. When the colors look right, your video feels more alive and tells the story better. Color correction basically works as the magic touch that makes your videos pop. Getting good at color correction is a big step for those who want to learn how to become a video editor.
So, let’s master the skill and open up a world of possibilities in video editing!
")
What is Color Correction?
Color correction is the process of getting your video’s color balance just right. Think about capturing a picture where the colors don’t appear to be what your eyes are seeing. It may be too light, too dark, or the color scheme is off. To fix these, color correction is like using a magic wand. It ensures that everything appears as it should, including the sky and grass.
In making videos, color correction is super important. It makes sure your video looks natural and nice. Sometimes, when you shoot a video, the light might make colors look weird. Color correction helps fix that. It improves the professionalism and visual appeal of your videos. It’s similar to picking out the right paint for a painting. With the right colors, your video can tell a better story and connect with people more, thus; it’s a crucial step in making great videos!
The Color Correction Basics
Color correction is all about balancing colors in your video. Consider it as doing color adjustments in a coloring book to get the best possible image. Making sure that blacks are truly black, whites are truly white, and everything in between looks just right is the fundamental idea. This enhances the authenticity and aesthetic appeal of your video.
Video editors use specialized hardware and software to accomplish this. These tools allow you to modify brightness, contrast, and color tones. Two programs that are frequently utilized for color correction are Final Cut Pro and Adobe Premiere Pro. To adjust colors, there are buttons and sliders. You can make the reds redder, the blues bluer, or even change the whole mood of your video. It’s like painting, but with video. With practice, anyone can learn to use these tools to make their videos look amazing!
Why Color Correction Matters?
To get the best possible video quality, color correction is essential. It can change a dull, lifeless video into something bright and exciting.
For example, think about a movie scene where the hero is feeling sad. Color correction can make the scene look a bit blue or grey, which helps us feel the sadness too. Or, in a happy scene, colors can be made brighter and warmer. This helps the audience feel the happiness in the scene.
In the real world, YouTube videos, TV series, and even films use color correction. It ensures that the colors are accurate and contribute to the narrative. It’s largely responsible for the superior visual quality of professional videos over unprofessional ones.
Film Composition Examples
Within this FREE PDF, you will discover:
- film composition examples in movies
- how filmmakers employ composition techniques
- how to create unforgettable cinematic experiences

Guide to Color Correction Basics
Here’s a simple guide to start with color correction:
- Choose Your Software: Start with video editing software like Adobe Premiere Pro, DaVinci Resolve, or Final Cut Pro. They are widely utilized and simple to master.
- Import Your Video: Open your video in the software. It’s like putting a photo in an album.
- Find the Color Correction Tool: Look for a tool or section named ‘Color Correction’. It’s usually simple to identify.
- Adjust Brightness and Contrast: Use sliders to make your video brighter or darker and to make the colors stand out more.
- Balance Colors: Look for sliders that adjust different colors. Ensure that what is white remains white, and what is black stays black.
- Play with Colors: Experiment with different settings to see what looks best. Each video is different, so trust your eyes.
- Save and Export: Once you are happy, save your work. Now your video is ready to share!
Tips and Tricks for Effective Color Correction (Basics)
Color correction can make your videos shine. Here are some handy tips:
- Start with Good Lighting: Good lighting when shooting your video makes color correction easier. Think of it like having a clean canvas to paint on.
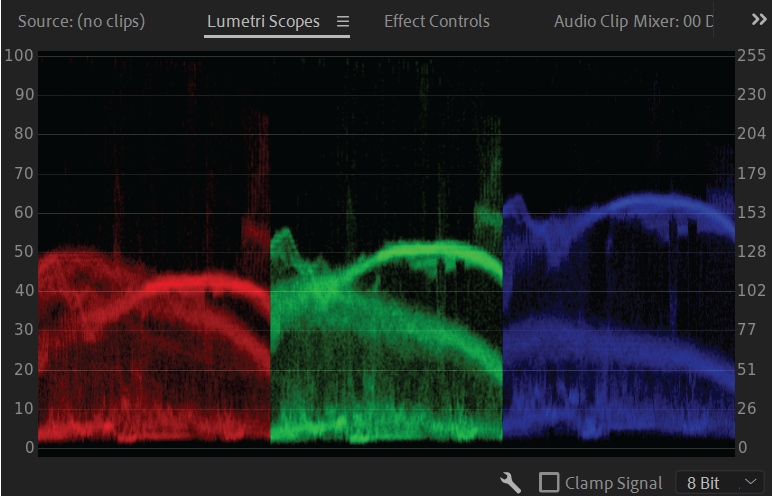
- Setup Scopes: When it comes to scopes, the Parade (RGB) serves the purpose of adjusting white balance and exposure, presenting three separate graphs for red, green, and blue. In the 8-bit format, the values on the right side of the graph span from 0 to 255, while those on the left range from 0 to 100. The highest point on the graph signifies the brightest values, while the lowest represents the darkest values.
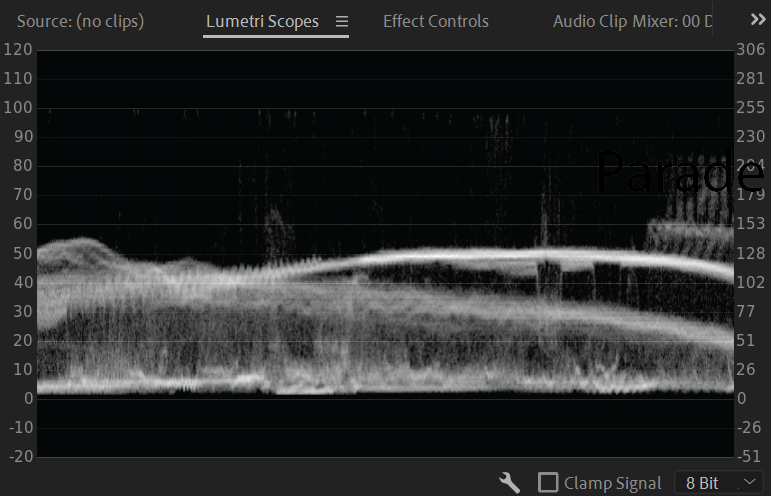
The Waveform (Luma) is employed for exposure correction and operates on a scale of 0 to 100 IRE, where 0 signifies absolute black and 100 denotes absolute white. Both the Waveform and Parade scope align with the image from left to right.
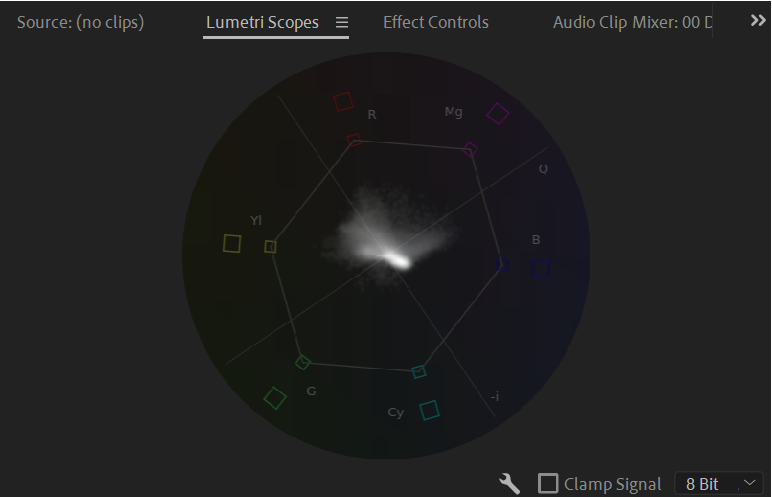
The YUV Vectorscope is a powerful tool in video editing that visualizes the chrominance information of an image, allowing editors to assess and correct color information accurately. Unlike the waveform or parade scopes that represent brightness and color intensity, the YUV Vectorscope focuses on the color phase and saturation. It displays color information in a circular pattern, with angles representing different hues and the distance from the center indicating saturation. By examining the spread and positioning of colors on the vectorscope, editors can identify color imbalances, and color casts, and ensure color accuracy in their video projects. This tool is especially valuable when fine-tuning skin tones and ensuring that colors are consistent and natural throughout a video sequence.
It’s crucial to note that scopes are unfailingly accurate. If your visual assessment suggests an imbalance, yet the scopes indicate equilibrium, it’s advisable to trust the information provided by the scopes. Various external factors, such as room lighting, screen calibration, and even the color of the surroundings, can distort the perceived color on your monitor. An interesting tidbit: Professional colorists often work in neutral grey rooms with specific lighting to ensure color accuracy is not compromised.
- Use Natural Colors as a Guide: Look at things like skin tones or the sky. They should look natural. It’s like making sure the grass looks green in a painting.
- Don’t Overdo It: It’s easy to get carried away with colors, Ensure everything is kept as simple as possible. Your video should look real, not like a cartoon.
- Practice with Different Scenes: Try correcting different kinds of videos – sunny, cloudy, and indoor. It’s like trying different recipes when you learn to cook.
Common Mistakes to Avoid
It’s common to make mistakes when first learning color correction. The following are some elements to be mindful of;
To begin with, try not to overdo things. While experimenting with different colors and intensities is enticing, excessive use can render your video unrealistic. It’s similar to adding too much salt to a dish, which can ruin its taste.
Another common mistake is ignoring the mood. The colors in your video should match the feeling of the scene. If it’s a happy moment, warm colors work well. For sad or serious scenes, cooler colors are better.
Also, remember that every screen shows colors differently. What looks good on your computer might not look the same on someone else’s. So, check your video on different screens if you can.
Wrapping Up the Color Correction Basics!
Learning color correction basics is a crucial milestone in your way to becoming a video editor or colorist. It makes your videos look professional and feel just right. So, keep practicing these skills; remember it’s a crucial step in how to become a video editor.
Film Composition Examples
Within this FREE PDF, you will discover:
- film composition examples in movies
- how filmmakers employ composition techniques
- how to create unforgettable cinematic experiences

Explore related content

Video Editing Tips CapCut: Tips, Tricks, and Techniques
Video editing is an art, and there are proper tools and techniques, through them everybody… Read More »Video Editing Tips CapCut: Tips, Tricks, and Techniques

Factors to Consider Before Buying a Video Editing Computer
From helping grow your brand and business to editing just for fun with the love… Read More »Factors to Consider Before Buying a Video Editing Computer

Best Video Editing Monitors in 2024
In the evolving world of video production, the importance of a high-quality monitor cannot be… Read More »Best Video Editing Monitors in 2024