What are the best export settings for Instagram , Facebook, or other social media networks? You are at the right place, we got you covered.
Imagine having the power to optimize your video content for every major social media platform without the headache of navigating through complex export settings. Well, consider your wish granted! In this guide, we’re not just demystifying the best export settings for Instagram in Premiere Pro; we’re empowering you with the knowledge of crafting tailored video content for YouTube, Vimeo, Facebook, Twitter, Instagram, and TikTok—all within the familiar confines of Adobe Premiere Pro.
Crafting Platform-Specific Magic
Before we delve into the technicalities, let’s establish a golden rule for those aiming to become a video editor: never export and upload the same video format on all platforms. Why, you ask? Because each platform has its own unique dynamics, and your content should seamlessly integrate with the way users engage on that particular medium.
So, here’s the game plan: create distinct renditions of your video, customized for the quirks of each platform.
Tailoring Your Best Export Settings for Social Media Triumph
Now, with your mind buzzing with platform-specific insights, let’s dive into the art of exporting content in Premiere Pro. We’re not just talking about exporting; we’re talking about exporting with finesse, precision, and a strategic touch. Because when it comes to social media and the best export settings for social media,” one size does not fit all.
Join us on this journey as we unravel the secrets of Premiere Pro’s export settings, ensuring your content shines bright on every platform. Get ready to master the delicate balance between technical prowess and creative finesse, propelling your videos to new heights of social media success.
The adventure begins now—let’s export greatness!
")
Best Export Settings for Social Media
YouTube
Responsive YouTube Player: Embracing the New Norm
YouTube’s player dynamics have shifted, and it’s crucial to keep pace. No longer confined to the 16:9 aspect ratio, YouTube’s player adapts seamlessly to the size of your video. Whether it’s the standard 16:9 or the vertical 9:16, the player adjusts, delivering an enhanced viewing experience tailored to your content’s native dimensions.
Navigating YouTube’s Duration and Size Limits: A Quick Overview
Before we delve into the art of exporting, let’s be mindful of YouTube’s duration and file size limits. If you’re unverified, videos are capped at 15 minutes, but as a verified user, you can unleash up to 12 hours of content with a staggering maximum file size of 256gb. If you’re diving into YouTube Shorts, remember to keep it snappy – no more than 60 seconds.
Optimizing Export Settings for YouTube Brilliance
Now, the million-dollar question: how do you ensure your exported video stands out in the vast sea of content on YouTube? The answer lies in the meticulously crafted export settings. When exporting for YouTube, the go-to choice is often the “H.264” format, coupled with Premiere Pro’s preset “Match Source-Adaptive High Bitrate.” But why opt for this over YouTube’s native presets?
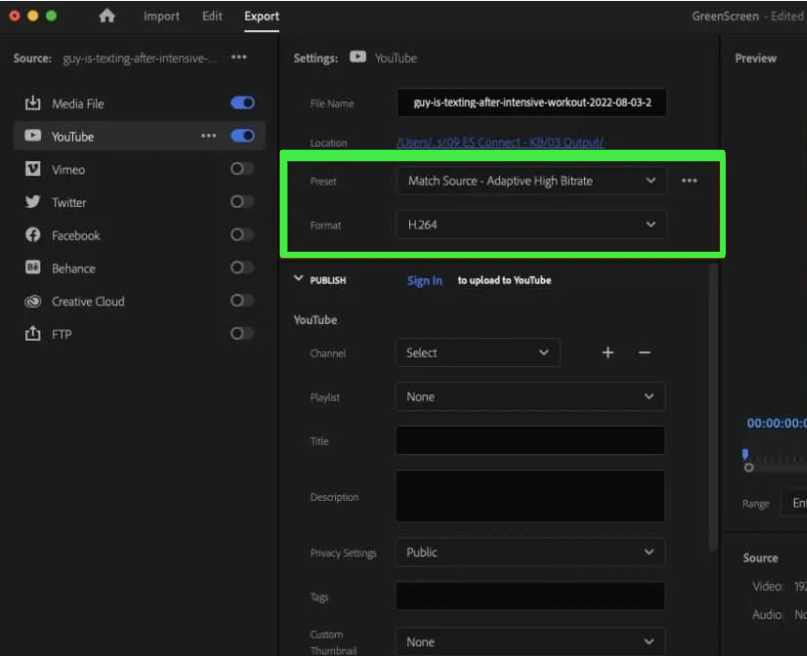
The magic lies in the “Match Source-Adaptive High Bitrate” preset – a dynamic powerhouse that tailors itself to the resolution of your video’s timeline settings. Whether it’s a 4k masterpiece, an FHD creation, or a vertical 9:16 marvel, this preset ensures the highest quality compressed video in the optimal .mp4 format. It’s not just a preset; it’s the epitome of adaptability, your all-encompassing solution for all social video.
Auto-Publishing Made Seamless
As a video editor, time is of the essence. Premiere Pro simplifies the YouTube upload process with an auto-publishing feature. Just toggle the YouTube icon, sign in to your channel, tweak your settings, and watch your content seamlessly transition from Premiere Pro to your YouTube audience. Choose playlists, add titles, descriptions, set privacy, add tags, and even upload a custom thumbnail – all within the export settings.
In a nutshell, understanding YouTube’s adaptive player, duration limits, and leveraging Premiere Pro’s optimal export settings is your ticket to YouTube success. Your journey to “become a video editor” is not just about the edits; it’s about presenting your creations in the best possible light. So, optimize those export settings, hit upload, and let your content shine on the digital stage. Your audience is waiting.
Best Premiere Pro Export Settings for Facebook
In the realm of social media, Facebook has transformed into more than just a platform; it’s a dynamic space for discovery, engagement, and storytelling. As content creators navigate this landscape, the need to tailor videos for optimal viewing experiences becomes paramount. For those aspiring to learn how to become a video editor, understanding the best export settings for Facebook in Premiere Pro is a crucial skill. Let’s delve into the nuances of crafting videos that not only captivate but seamlessly integrate into the Facebook experience.
Understanding the Shift to Square: A Trend Analysis
A noticeable trend has emerged where companies repurpose content originally designed for platforms like YouTube onto Facebook. The shift often involves transforming the aspect ratio from the original UHD (16:9) to a square format (1:1) with a 1080×1080 resolution. Unlike YouTube, Facebook’s video player isn’t confined to the 16:9 ratio, eliminating the need for those pesky black-bar pillars on the sides of square videos.
Leveraging Premiere Pro’s Auto-Reframing Tool
For those repurposing landscape videos into square formats, Premiere Pro offers a powerful auto-reframing tool. This feature enables a seamless transformation of your sequence into a new aspect ratio, ensuring your content aligns with Facebook’s square video trend. Explore the tool in action through the instructional video provided below.
Optimal Premiere Pro Export Settings for Facebook: A Blueprint for Quality
To ensure your videos shine on Facebook, understanding the optimal export settings is key. Here’s a breakdown of Meta’s recommended video settings:
- Format: H.264 video codec, .Mp4 format
- Resolution: 1080p or less
- Recommended Aspect Ratios: Square 1:1 or Rectangular 16:9 (Mobile Phones)
- File Size Limit: Supports video file size up to 10GB
- Video Length: Must be less than 240 minutes
- Audio Codec: Stereo AAC audio compression with 128kbps
Export Presets and Sequencing for Facebook’s Square Format
For creators embracing the square format trend, utilizing the right export presets is paramount. While there’s a Premiere Pro Facebook 1080p Full HD export preset for the traditional 16:9 ratio, the growing popularity of square-format videos demands a different approach. Instead, opt for the “Match Source – Adaptive High Bitrate” preset, ensuring your square video exports in the correct dimensions and highest quality.
But, before hitting that export button, set up your sequence settings for a 1080×1080 Facebook video. Navigate to “New Item” in your Project Panel, select “New Sequence,” and opt for “Digital SLR 1080p24.” Simply change the horizontal value to 1080, save the preset as “Facebook 1080×1080,” and you’re ready to edit.
Exporting with Precision: Facebook Publishing and Captions
As you reach the final stages of video editing, head to the Export workspace. Select the “H.264” format, choose “Match Source – Adaptive High Bitrate,” and, if you wish to auto-publish to Facebook, enable Facebook publishing from the left tab. This streamlined process allows you to seamlessly login, select the desired page, and add a title and description.
For an enhanced viewing experience, especially since many users watch videos on Facebook with the sound off, consider burning captions into your video. Utilize the “Captions” tab in Premiere Pro, choosing to “Burn the Captions into Video.” This step ensures your captions remain intact, even when the sound is muted.
Crafting videos for Facebook involves more than just storytelling; it’s about creating an immersive experience tailored to the platform’s nuances. By mastering the best premiere pro export settings for Facebook and techniques, you’re not just learning how to become a video editor, but also how to become a storyteller who resonates with the Facebook audience. Dive into the world of seamless video creation and let your content stand out in the vibrant realm of social media.
Film Composition Examples
Within this FREE PDF, you will discover:
- film composition examples in movies
- how filmmakers employ composition techniques
- how to create unforgettable cinematic experiences

Best Premiere Pro Export Settings for Instagram
In the dynamic world of social media, Instagram has become a powerhouse for visual storytelling, and mastering the art of creating captivating videos for platforms like Instagram Reels is a game-changer. If you’re on a quest to learn how to become a video editor adept at crafting content tailored for Instagram, you’re in the right place.
Understanding Instagram Reels Specifications
Creating content for Instagram comes with its own set of specifications, especially for Instagram Reels. The platform provides flexibility in terms of aspect ratios, allowing you to express your creativity. Here are the key specs you need to keep in mind:
-
Video Aspect Ratio: Instagram Reels supports various aspect ratios, ranging from Landscape (1.91:1) to Vertical (9:16), however, the Vertical is a way to go with Instagram Reels. Other popular choices include Square (1:1) at 1080×1080, Portrait (4:5) at 1200×1500, and Vertical (9:16) at 1080×1920.
-
Minimum Frame Rate & Resolution: Ensure your videos have a minimum frame rate of 30fps and a resolution of at least 720 pixels.
-
Maximum Length and Size: Videos of up to 10 minutes should not exceed 650mb, while videos up to 60 minutes can go up to 3.6gb.
-
Instagram Reel Length: Keep in mind that Instagram Reels allows videos up to 90 seconds.
-
Video Format: For the best export settings for Instagram Premiere Pro, the optimal video format is H.264 format.
The Best Export Settings for Instagram Premiere Pro
Now, let’s talk about the crucial step of exporting your masterpiece from Premiere Pro. Here’s a step-by-step guide to ensure your video meets Instagram Reels’ specifications:
-
Export Workspace: Head to the Export Workspace in Premiere Pro.
-
Choosing the Right Preset: I recommend using the preset “Match Source – Adaptive High Bitrate” for optimal quality. This preset ensures your video maintains high quality, crucial for social media visibility.
-
Caption Integration: If your video includes captions, navigate to the captions tab and select “Burn into video.” This ensures that your captions are seamlessly integrated into the video, as Instagram Reels doesn’t support separate caption files.
Transferring Your Video to Your Phone
As Instagram Reels doesn’t allow direct video uploads from the desktop, you’ll need to transfer your file to your mobile device. Here’s how you can do it:
-
iPhone Users: Utilize Airdrop for a seamless transfer. Once sent, your video will automatically be saved to your camera roll.
-
PC Users: Employ cloud-based platforms like Dropbox or Google Drive to share the video file with your mobile device.
By understanding Instagram Reels’ specifications and exporting your video with precision, you’re well on your way to making a significant impact on this visual-centric platform. As you continue your journey on “how to become a video editor,” mastering the best export settings for Instagram in Premiere Pro becomes a valuable skill. Craft your content with finesse, export with precision, and watch your creations shine on Instagram Reels.
Tik Tok
Unlike some other platforms, TikTok’s straightforward approach to video formatting—maintaining a vertical (9:16) aspect ratio and a 1080×1920 resolution—offers a canvas ready for your creativity.
If you’re like many content creators who prefer the precision and power of Premiere Pro, you might find yourself navigating the bridge between your editing software and the TikTok app. Here’s where choosing the best export settings for social media becomes crucial.
Choosing the Right Format: H.264 is Your Ally
Just like Instagram, TikTok favors the H.264 format for optimal compatibility and efficiency. Within Premiere Pro, select the “Match Source – Adaptive High Bitrate” preset. This not only ensures the highest quality for your video but also results in a file size that’s friendly for swift uploads and seamless playback on TikTok.
Length Restrictions to Keep in Mind
TikTok, known for its short and snappy content, imposes certain length restrictions:
- Videos created directly on TikTok can be up to 60 seconds long, catering to the platform’s preference for bite-sized content.
- However, if you’ve crafted your masterpiece using a different application, you can extend the duration to a maximum of 3 minutes.
Now, let’s address a common scenario: you’ve meticulously edited your video in Premiere Pro, and it’s time to share your creation with the TikTok community. Instead of relying on in-app editing, you want the precision and finesse that a professional editing suite provides.
In this case, airdropping the video to your mobile device or utilizing Google Drive for a seamless transfer is your go-to strategy. Once your video is ready for the TikTok stage, you can confidently adhere to the recommended export settings.
Crafting Your TikTok Presence
At the heart of every successful TikTok video lies a combination of creativity and technical finesse. By leveraging the capabilities of Premiere Pro and adhering to the best export settings for social media, you’re not just creating content; you’re crafting a captivating TikTok presence.
Conclusion: Elevate Your Content with the Best Export Settings for Social Media
As we wrap up this exploration into the intricacies of video export settings for social media, it’s clear that the road to captivating content involves more than just creative flair—it requires technical precision. Understanding the nuances of export settings is the gateway to ensuring your videos not only shine with creativity but also seamlessly integrate into the diverse landscapes of social media platforms.
Whether you’re curating cinematic masterpieces on YouTube or creating snappy moments on TikTok, consistency in export settings is your secret weapon. The H.264 format emerges as the universal ally, balancing quality and efficiency across platforms like Instagram and TikTok.
In the dynamic realm of social media, where attention spans are brief and the competition is fierce, every detail matters. The “Match Source – Adaptive High Bitrate” preset becomes your trusted companion, optimizing video quality while keeping file sizes compact for speedy uploads.
As you embark on your journey to share stories, showcase products, or connect with your audience through the lens of social media, remember that the technical choices you make behind the scenes are the pillars supporting your creative vision.
Feel free to experiment, learn, and adapt. The world of social media is ever-evolving, and so are the preferences and requirements for video content. By staying informed and mastering the best export settings for social media, you position yourself not just as a content creator but as a curator of experiences.
Film Composition Examples
Within this FREE PDF, you will discover:
- film composition examples in movies
- how filmmakers employ composition techniques
- how to create unforgettable cinematic experiences

Explore related content

Video Editing Tips CapCut: Tips, Tricks, and Techniques
Video editing is an art, and there are proper tools and techniques, through them everybody… Read More »Video Editing Tips CapCut: Tips, Tricks, and Techniques

Factors to Consider Before Buying a Video Editing Computer
From helping grow your brand and business to editing just for fun with the love… Read More »Factors to Consider Before Buying a Video Editing Computer

Best Video Editing Monitors in 2024
In the evolving world of video production, the importance of a high-quality monitor cannot be… Read More »Best Video Editing Monitors in 2024